 Subject: FX5 overhaul Subject: FX5 overhaul  Yesterday at 4:28 pm Yesterday at 4:28 pm |  |
I apologize for not getting pictures, because that would make a huge difference in reviewing my recent experience, but I'm old and am slow to the trend of whipping out my phone for every life event!
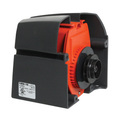
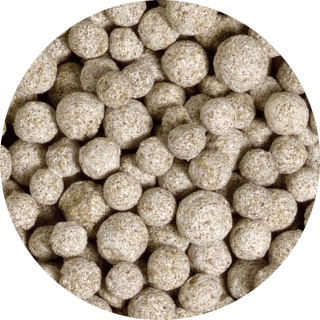
I have been running a Fluval (Hagen) FX5 on my 150 for six years. This filter has a handy purge valve at the bottom so you can attach a 5/8" tube to drain the filter and do a water change at the same time. I don't utilize this method, preferring to use a Python and vacuum debris from the tank while I change water. When I clean out the filter every month or so I disconnect the intake and outflow hoses, and drain the filter a bit so I can carry it to the sink or outside on the deck to rinse out the foam pads and rinse out the unit. The filter weighs about 70 pounds full of water, so draining it first is, for me, a must! NOTE: I know the recommended practice for rinsing out filter media and filters involves using dechlorinated water, and many are careful to stress the importance of this. I do not discourage or dispute the importance of attempting to preserve the bacterial colonies present in the filter media and filter itself, as they work with the mechanical filtration to maintain the cycle of the tank and prevent toxic levels of ammonia and nitrite. That said, I admit freely that I do not, in general, follow this practice at all. I take my FX5 (and my other large canister filters, Eheims and Rena/API Filstars) outside, weather permitting, and use the hose to rinse them out thoroughly, and use the strong spray from the hose to rinse the foam and ceramic media. I am on a municipal water system, so there is definitely chlorine present. In the cold weather months I do this in the sink, using the sink sprayer attachment to thoroughly clear the unit and the media of debris. I do the same with my HOB filters, running the boxes themselves under the tap and rinsing the media cartridges/foam pads under the tap as well, chlorine and all. My tanks are well established, and in my own personal experience over the past 30 years I have not had a problem cleaning my filters in this way. I don't tend to clean out filters on new tanks, or tanks that have not "settled in" and are still unstable, 6 months and earlier. After that, I consider the bacterial colonies present inside the tank to be adequate to handle the bioload even if I put a brand new filter on the tank, so killing off bacteria from the filter has never (*knocks wood*) caused a problem for me in all these years. When giving advice to those new to the hobby, however, I would recommend against doing things like I do them, and would always suggest rinsing filters and media in tank water or dechlorinated water, just to take that variable out of the equation, and to support best practices. This is a classic case of "do as I say, not as I do!" The last time I cleaned the FX5 of the finger tabs for the purge valve snapped cleanly off. I don't know why, since I don't use a tool or other forcible action to turn the valve to open it, but this rendered the valve almost useless, since you can't turn this very stiff valve without twisting using two fingers. Fortunately, you can buy a replacement valve for this filter. I paid $19.95, which is steep, and I'm sure if I went on ebay and shopped around a bit I could have found it for less, but I was impatient. The valve itself was perfectly functional and the filter was not leaking, but to clean the filter I'd be forced to open it up, remove the media baskets and scoop or siphon out the water manually before being able to lift the filter out from under the tank, and that's a pain. I received my replacement purge valve from Aquarium Parts Warehouse promptly, and after removing the media baskets and scooping out more than half the water (saved it in watering cans for my plants - they love the gunky filter water!) I took the unit out onto the deck to clean it and replace the valve. I am so happy when warm weather returns and I can perform this procedure with the garden hose on the deck, instead of my kitchen sink, which is not very large. I need the Utility Sink Fairy to pay me a visit. There's a little tab that keeps the purge valve from spinning in the housing, so you pry back this tab very slightly and the purge valve pulls straight out, and the new one pops right in - no problem. The O-rings are built in so that's all that is required, though I like to use a bit of Vaseline on the O-rings prior to installation. It's almost impossible to put the new valve in wrong, so I was grateful for the design. A little rant here: Anyone who has been in the hobby long enough knows that often the replacement part is a bit sturdier and more solid than the original part being replaced. Not always, but often. I was sure the finger tabs would be thicker and stronger on the replacement, but they are NOT. It is the same valve. I'll just have to be careful, though I don't know what caused the finger tab to break in the first place. I was disappointed, nonetheless. I decided to take this opportunity to remove the pump housing and clean out the impeller, which is not something I do very often. This is what it looks like, on the Hagen/Fluval site:  You simply use a Phillips head screwdriver, one that is 4-6" long and skinny, ideally, and remove the 4 small bolts that attach the motor to the filter body. The nuts are held in place on the backside of the fittings with retaining clips, so you don't have to keep track of these very tiny objects, just the tiny bolts. I removed it and looked down into the impeller, and found, to my surprise (and amusement, I have to say), 3 small ceramic filter media balls, Eheim Substrat. You've probably seen the stuff, it looks like this, and they're about 1/4" in diameter:  This is the part I wished I had taken a picture of, because the first thing I thought of was the movie Finding Nemo, where in an effort to escape the aquarium in the dentist's office Nemo goes inside the filter box and jams the filter with a piece of gravel from the tank bottom. It looked just like that. Fortunately, this did not render the filter useless, because it was certainly still quite functional and the flow was not terrible, though it had slowed and I thought it just needed cleaning. This is why I could afford to be amused at what I found. I use those media granules for biofiltration, but the basket in the FX5 has holes that are just BARELY smaller than the ceramic balls, and obviously a few got through, and made their way into the impeller. I'm lucky it didn't burn up the entire motor, actually, and I placed circular foam pads (Fluval, designed to fit the filter baskets) in the bottom of the tray that holds this biomedia, to mitigate any migration of media into other parts of the filter. Nylon media bags would be even better. I should have done that to start with, but didn't realize the balls could get through. Live and learn. Now my FX5 is completely rehabbed and ready for action once again. I carried it back in, connected the inflow and outflow hoses, allowing gravity to siphon-fill the filter, did my PWC and started it up. The flow was noticeably stronger, and I'm grateful to have found there was a problem before the filter was ruined. Sometimes I wish that this type of thing was my job, because I could do it all day - PWCs, aquascaping, rearranging, cleaning out filters, solving problems, researching, etc. When I finished with this tank I had not even noticed that it was now about 10 pm, since I started around 6:30. When you completely lose track of time, miss meals and other appointments without realizing it, you know you're doing something you were meant to do. So, don't be like me and put off filter maintenance! It pays to do routine checks of your valuable equipment that needs to be running reliably 24/7, 365. Thanks to this blog, recording my every waking thought about my tanks as well as every embarrassing mishap, I see that I've had this filter running for 6 years. I still love it, and highly recommend the Hagen Fluval FX5. | |
Wednesday, April 8, 2015
Fluval FX5 Purge Valve, and Did a Fish Pull a "Nemo" ?
Subscribe to:
Post Comments (Atom)


No comments:
Post a Comment